Building a native macOS configurator for Adafruit's Macropad
Contents
Adafruit’s Macropad is an absolute hardware delight: a cluster of 12 keys, with individual lighting, plus an OLED screen, rotary encoder and even a speaker! While external, programmable keypads are common enough, there’s something to this combination of features that makes the Macropad more than the sum of its parts.
 Photo via Adafruit
It’s just a treat to hack on, and one of the rare technologies that makes me feel like a kid again, eager to experiment and try new things.
Photo via Adafruit
It’s just a treat to hack on, and one of the rare technologies that makes me feel like a kid again, eager to experiment and try new things.
I want to walk you through a project I spun up recently, building a bit of macOS software to make my own Macropad easy to configure and tinker with:
 I’ll explain not just what I built, but how I approached solving the problems of integrating two very different systems speaking different languages. This stuff is essential to success in any sort of technology pursuit, but I always wish I saw more discussion of how we practioners do it.
Here’s my contribution.
Problem: configuration and iteration
I’ve been using programmable keyboards for years. Essential to success, for me, is iteration. Finding the most useful, comfortable layout of keys is a matter of trial and error, so I want to be able to experiment quickly with minimal friction.
So step one was finding whatever code existed to let me customize the Macropad’s key layouts.
Here I was in luck. Adafruit provides a terrific starting point:
What’s brilliant about this example code is that fully utilizes the magic of the Macropad: turn its rotary encoder to move back and forth between pages of hotkeys. The page title and keymap labels are displayed on the OLED screen.
 This seems simple and even obvious, but to me it’s a game changer because it makes an enormous breadth of keymaps viable. I don’t have to memorize key positions, so I can make pages upon pages of keys to solve whatever common problems I have.
There was just one wrinkle:
The configuration ergonomics.
Speaking to the Macropad
Macropad is built on an RP2040. This is a microcontroller: a tiny, specialized computer that you can code to solve a specific problem. Microcontrollers are amazing for hardware projects like the Macropad because they’re able to wrangle all kinds of electronic components—switches, lights, screens—and make them as easy to program as any software application on your computer.
Microcontrollers are hidden everywhere in your digital existence, but hobbyist platforms like RP2040, Arduino and others come with an ecosystem for conveniently programming and troubleshooting them without any specialized hardware. Plug them in via USB and you’re off to the races.
RP2040 supports code written two ways: C and Python. Adafruit’s example code used Python, so I followed their lead.
Most of this code was exactly what I wanted. Crucially, they’d solved all the problems of acting like a USB keyboard for me, picked out all the libraries I’d need. This is real research and experimentation effort saved.
But in terms of iterating on my keymaps, it didn’t quite hit the spot. Here’s how you define keymaps in their example project:
    app = {                    # REQUIRED dict, must be named 'app'
        'name' : 'Mac Safari', # Application name
        'macros' : [           # List of button macros...
            # COLOR    LABEL    KEY SEQUENCE
            # 1st row ----------
            (0x004000, '< Back', [Keycode.COMMAND, '[']),
            (0x004000, 'Fwd >', [Keycode.COMMAND, ']']),
            (0x400000, 'Up', [Keycode.SHIFT, ' ']),      # Scroll up
            [...]
To tell the Macropad what to do for a given key, you provide an array of tuples, corresponding to each key, specifying:
- hexadecimal value for backlight color
- label string
- an array of key presses
Thus,
(0x004000, '< Back', [Keycode.COMMAND, '['])
would create a key labeled < Back, with a green backlight, sending the key combination Command-[.
Look, this works, but there’s a lot of cognitive overhead involved. You have to build up these tuples, do RGB hexadecimal math for the colors, and make a tidy Python dictionary.
Better than a stick in the eye, but I’ve been spoiled by decades of GUI configurators for my input devices.
Still, this project had 90% of what I needed. If I could find a way to ingest configuration content that could replace this fiddly Python dictionary approach, I could build an interface for programming the keymaps however I wanted.
So that’s where I went next.
How do you say ‘red’?
After digging through this example code, I wrote down all of the things I needed to communicate to the Macropad to build custom layouts.
Some stuff was easy: if you want to specify a label that shows up on a screen, you use a string.
Other stuff needed a little checking. The colors were specified using hexadecimal. In other languages, I often see RGB hex handled as a string, but in this Python code, it took the form of 0xXXXXXX.
I’ve seen this around since I began using computers, but I never needed to actually know what it meant. In this context, the hex was being treated as an integer, expressed in hexadecimal notation. A little fiddling quickly confirmed the Macropad would treat it with the same behavior of hex colors I knew from the web, so that meant I didn’t need to handle colors in a unique way, which was a good start.
My next question was: can I convert a string into a hex integer in Python? StackOverflow, naturally, had me covered:
int("0xa", 16)
Initialize an int with a hex string, specify that its base is 16, and Python will do the rest.
So that’s the colors sorted. I could handle them like hex strings, externally. Again, strings are easy.
A thornier question remained: what about special keys, like option, command, etc? In the sample code they’re represented with some sort of Python variable, so I went on a hunt to find where these were defined.
Keycodes were represented like Keycode.COMMAND, and a comment in the configuration files offered this hint:
from adafruit_hid.keycode import Keycode # REQUIRED if using Keycode.* values
From that, I can infer:
- Keycodes rely on an imported dependency
- That dependency lives in a library called
adafruit_hid
Sure enough, googling that led me to Adafruit’s GitHub project for a HID library. What’s HID? It stands for Human Interface Device, and it’s the USB standard that allows keyboards, mice and other peripherals to communicate on behalf of you and me.
From there it was a matter of digging around in the project structure until I found keycode.py, which contained a mapping of keycode names to the lower-level values the HID library relied on.
Spoiler: it was more hexadecimals:
        LEFT_CONTROL = 0xE0
        """Control modifier left of the spacebar"""
        CONTROL = LEFT_CONTROL
        """Alias for LEFT_CONTROL"""
Well, I’d just learned that hex values could travel easily as strings, so that’s not a big deal.
With these questions answered, I had the basics for translating values from outside the Macropad into input that it could properly interpret.
Next I’d need a medium to structure and carry these values.
Enter JSON
JSON is great: it’s become a universal standard, so every platform has a means of parsing it, including Python. It’s easy enough to inspect simple JSON with your own eyes, so that helps with troubleshooting and iterating.
I started by thinking through a structure for a JSON configuration payload:
    Array: To contain pages of keymaps
    	Dictionary: To define a page
    		String: Page name
    		Array: To contain keys
    			Dictionary: To define a key
    				String: Color (as hex)
    				String: Label
    				String: Macro
It would require a few iterations to get this to a final form, but this early structure was enough to get things moving.
Next I needed to learn enough Python to parse some JSON.
One of the most important habits I’ve picked up in a career of programming: isolate your experiments. Instead of trying to write and debug a JSON payload parser inside of the existing Hotkeys project, with the Macropad reporting errors, I used an isolated environment where I could get easy feedback about my bad code. Replit seems to provide the most robust, one-click, “let me just run some Python” experience online right now, so that’s where I ended up.
I badly wanted to figure out how to convert my JSON into proper Python objects, whose properties I could access with dot notation. This is how I’ve done JSON parsing in Swift for years, and it felt tidy and safe.
But after chasing my tail reading tutorials and Stack Overflow for awhile, I gave up and accessed everything using strings as dictionary keys. It was good enough. Ergonomics in the parsing code weren’t essential. Once it was up and working, I wouldn’t need to fiddle with it very much.
    with open('macro.json') as f:
      pages = json.load(f)

    for page in pages:

      keys = page['keys']

      imported_keys = []

      for key in keys:
        color_hex_string = "0x" + key['color']
        color_hex = int(color_hex_string, 16)
        macro = key['macro']
        [...]
It’s straightforward enough. The code loads a JSON file, iterates through the pages, pulls values out of the dictionaries it finds, builds key-specific tuples, doing conversions on hex code strings, and then plugs it all into the App class provided by the sample code, which represents a page. These are stored to an array.
Again, I don’t know any Python, so this took a bit of trial and error. Getting immediate feedback on syntax and errors from Replit’s environment helped me work through the bugs easily.
Once it all seemed to parse JSON properly, I dropped my code into the Hotkeys project, replacing the part that went looking for Python configuration values.
Macropad was happy, displaying a simple configuration I’d written in JSON by hand.
We were on our way.
A tool to create tools
With the basics of a working JSON structure, and a means for the Macropad to translate that JSON into keymaps, the table was set for real fun:
Building a user interface.
I’ve spent the last couple years writing a lot of SwiftUI code, and I was eager to try it out on macOS.
It’s surprising how straightforward it is to build multi-pane, hierarchical navigation in SwiftUI:
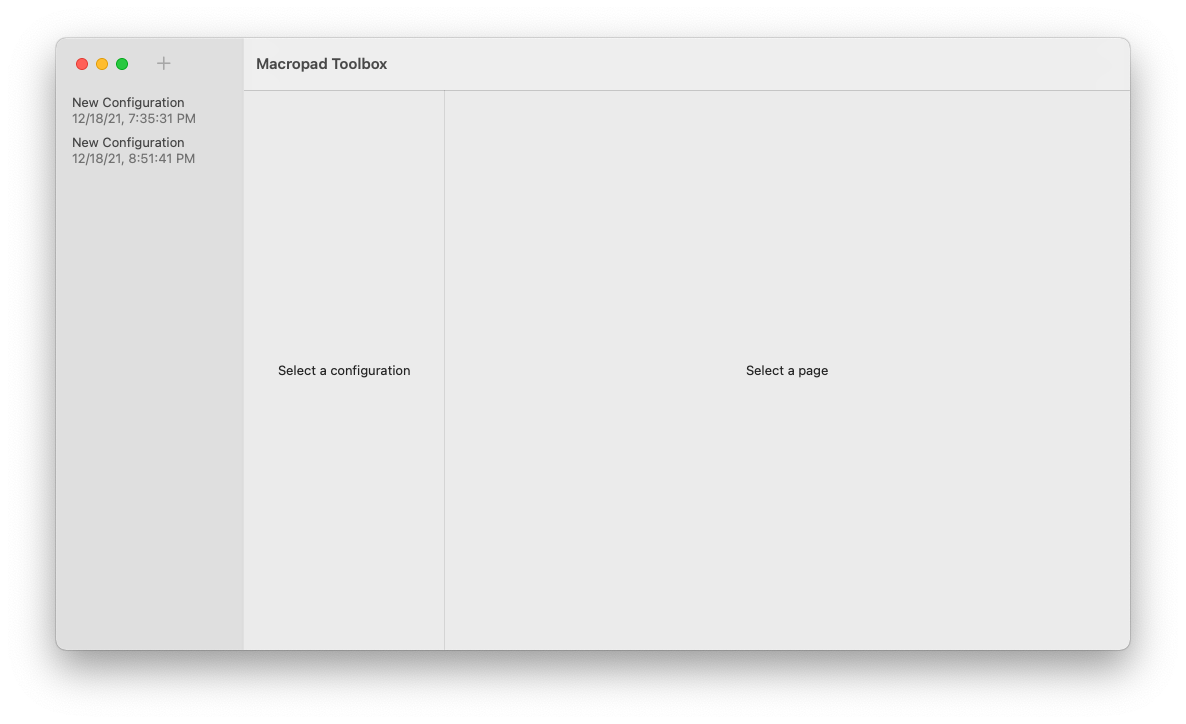 The old way, using AppKit and nib files, would have required loads more effort. But I had the basics of this up and working in a couple hours.
It’s not the most intuitive thing ever, but a quick google for swiftui macOS three column layout got me a terrific walkthrough that explained the process.
Next, I needed:
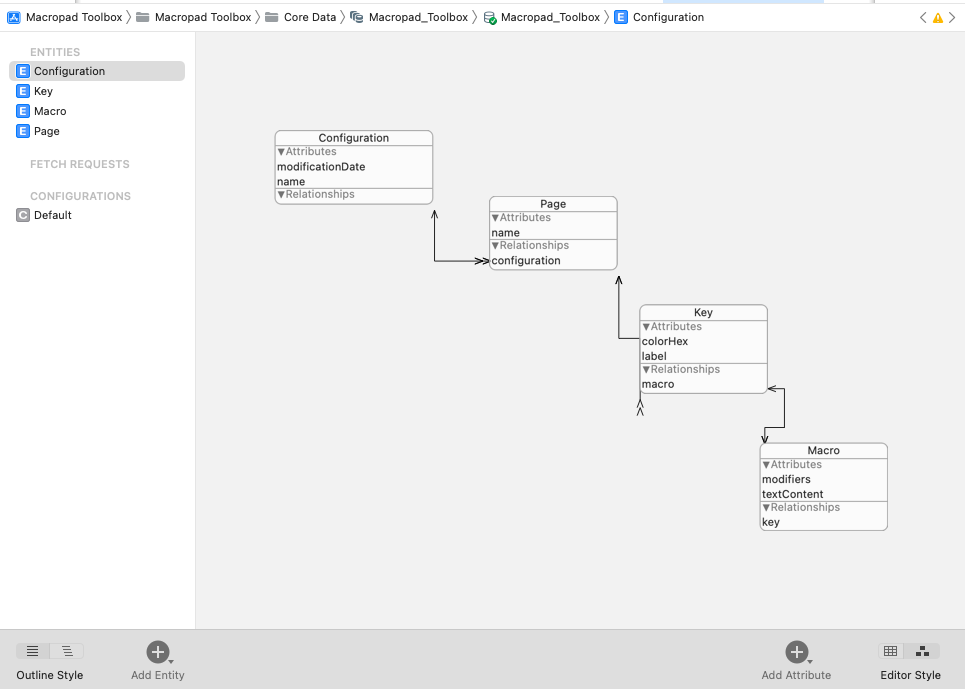
- A data model to represent configurations, pages, keymaps, etc
- A means of persisting those configurations so I could revise them later
For this, I turned to Core Data. It’s a polarizing technology. Many hate its GUI model editor, and it’s got plenty of complexity to manage. But as persistence strategies go, you can’t beat its out-of-the-box integration with SwiftUI. I’ve done enough time in the Core Data salt mines that I could quickly bang out the object graph I wanted and use it to generate JSON files. Best of all, the app could quietly store everything between sessions for easy iteration.
 Modifiers were a challenge. In a perfect world, I could import
 keycode.py into Swift somehow and directly reference the values. My reading suggests this is possible, but I couldn’t sort out how. In the end, I used a spreadsheet to transform the Python code into Swift enum cases, making the hex values into strings:
    enum AdafruitPythonHIDKeycode: String, CaseIterable, Identifiable {

        var id: String {
            return rawValue
        }

        case
        COMMAND = "0xE3",
        OPTION  = "0xE2",
        CONTROL  = "0xE0",
        SHIFT  = "0xE1",
        […]
    }
As an enum, it was easy to iterate through all of the modifier keys and represent them in the UI. Storing them as strings made them easy to persist in Core Data. In theory I could convert them into plain integers, and send them around that way, but this seemed like less work to debug.
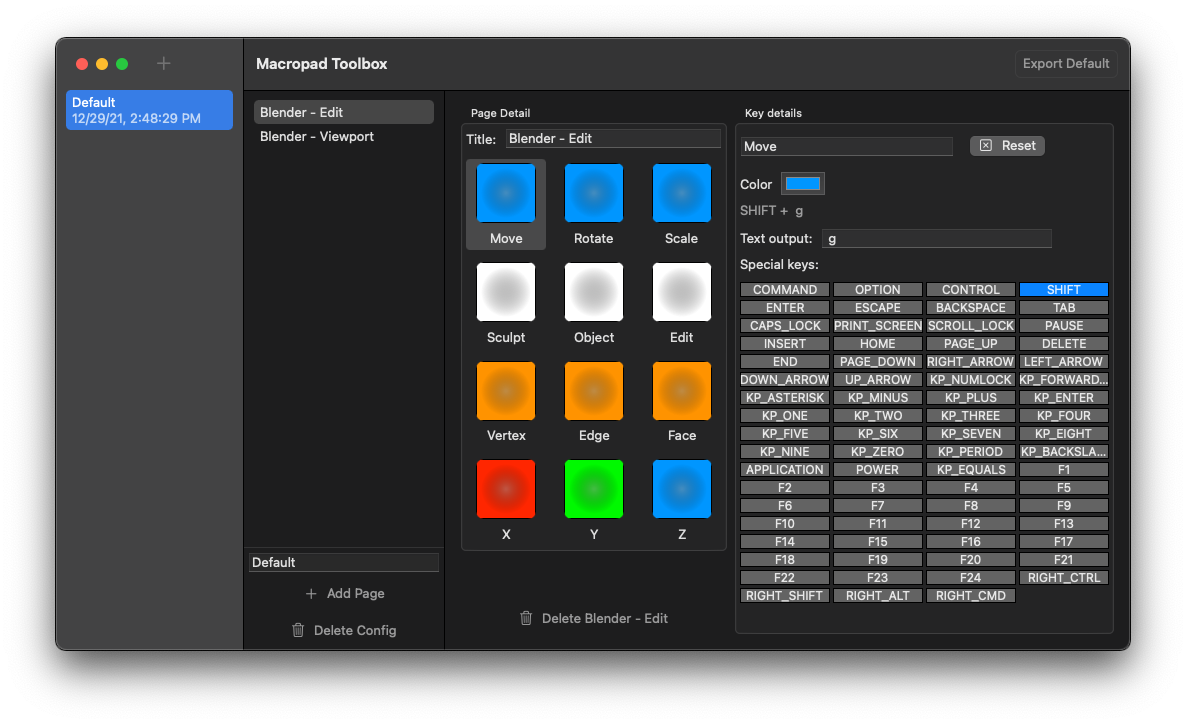
With navigation working and a data model specified, I went to work on the editor UI. My requirements were simple:
- It had to visually represent the layout of the real thing
- Editing had to be fast and easy
What I ended up with was a grid representing each key. Clicking a key let you edit its color (with a picker!), label text, and output. Thanks to the magic of SwiftUI, and a generous soul on StackOverflow, it was even easy to provide drag-and-drop reordering of the keys.
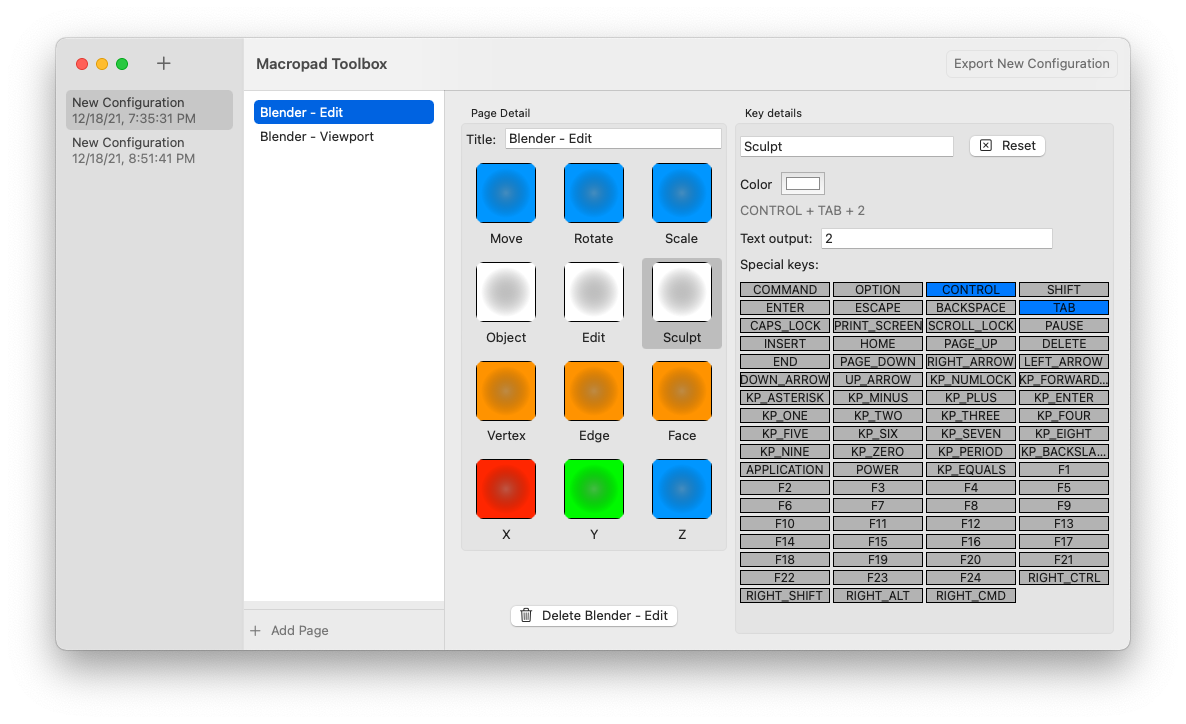 Clicking a button exported a json file, which could be saved directly to the Macropad—it shows up as a USB storage device on your computer.
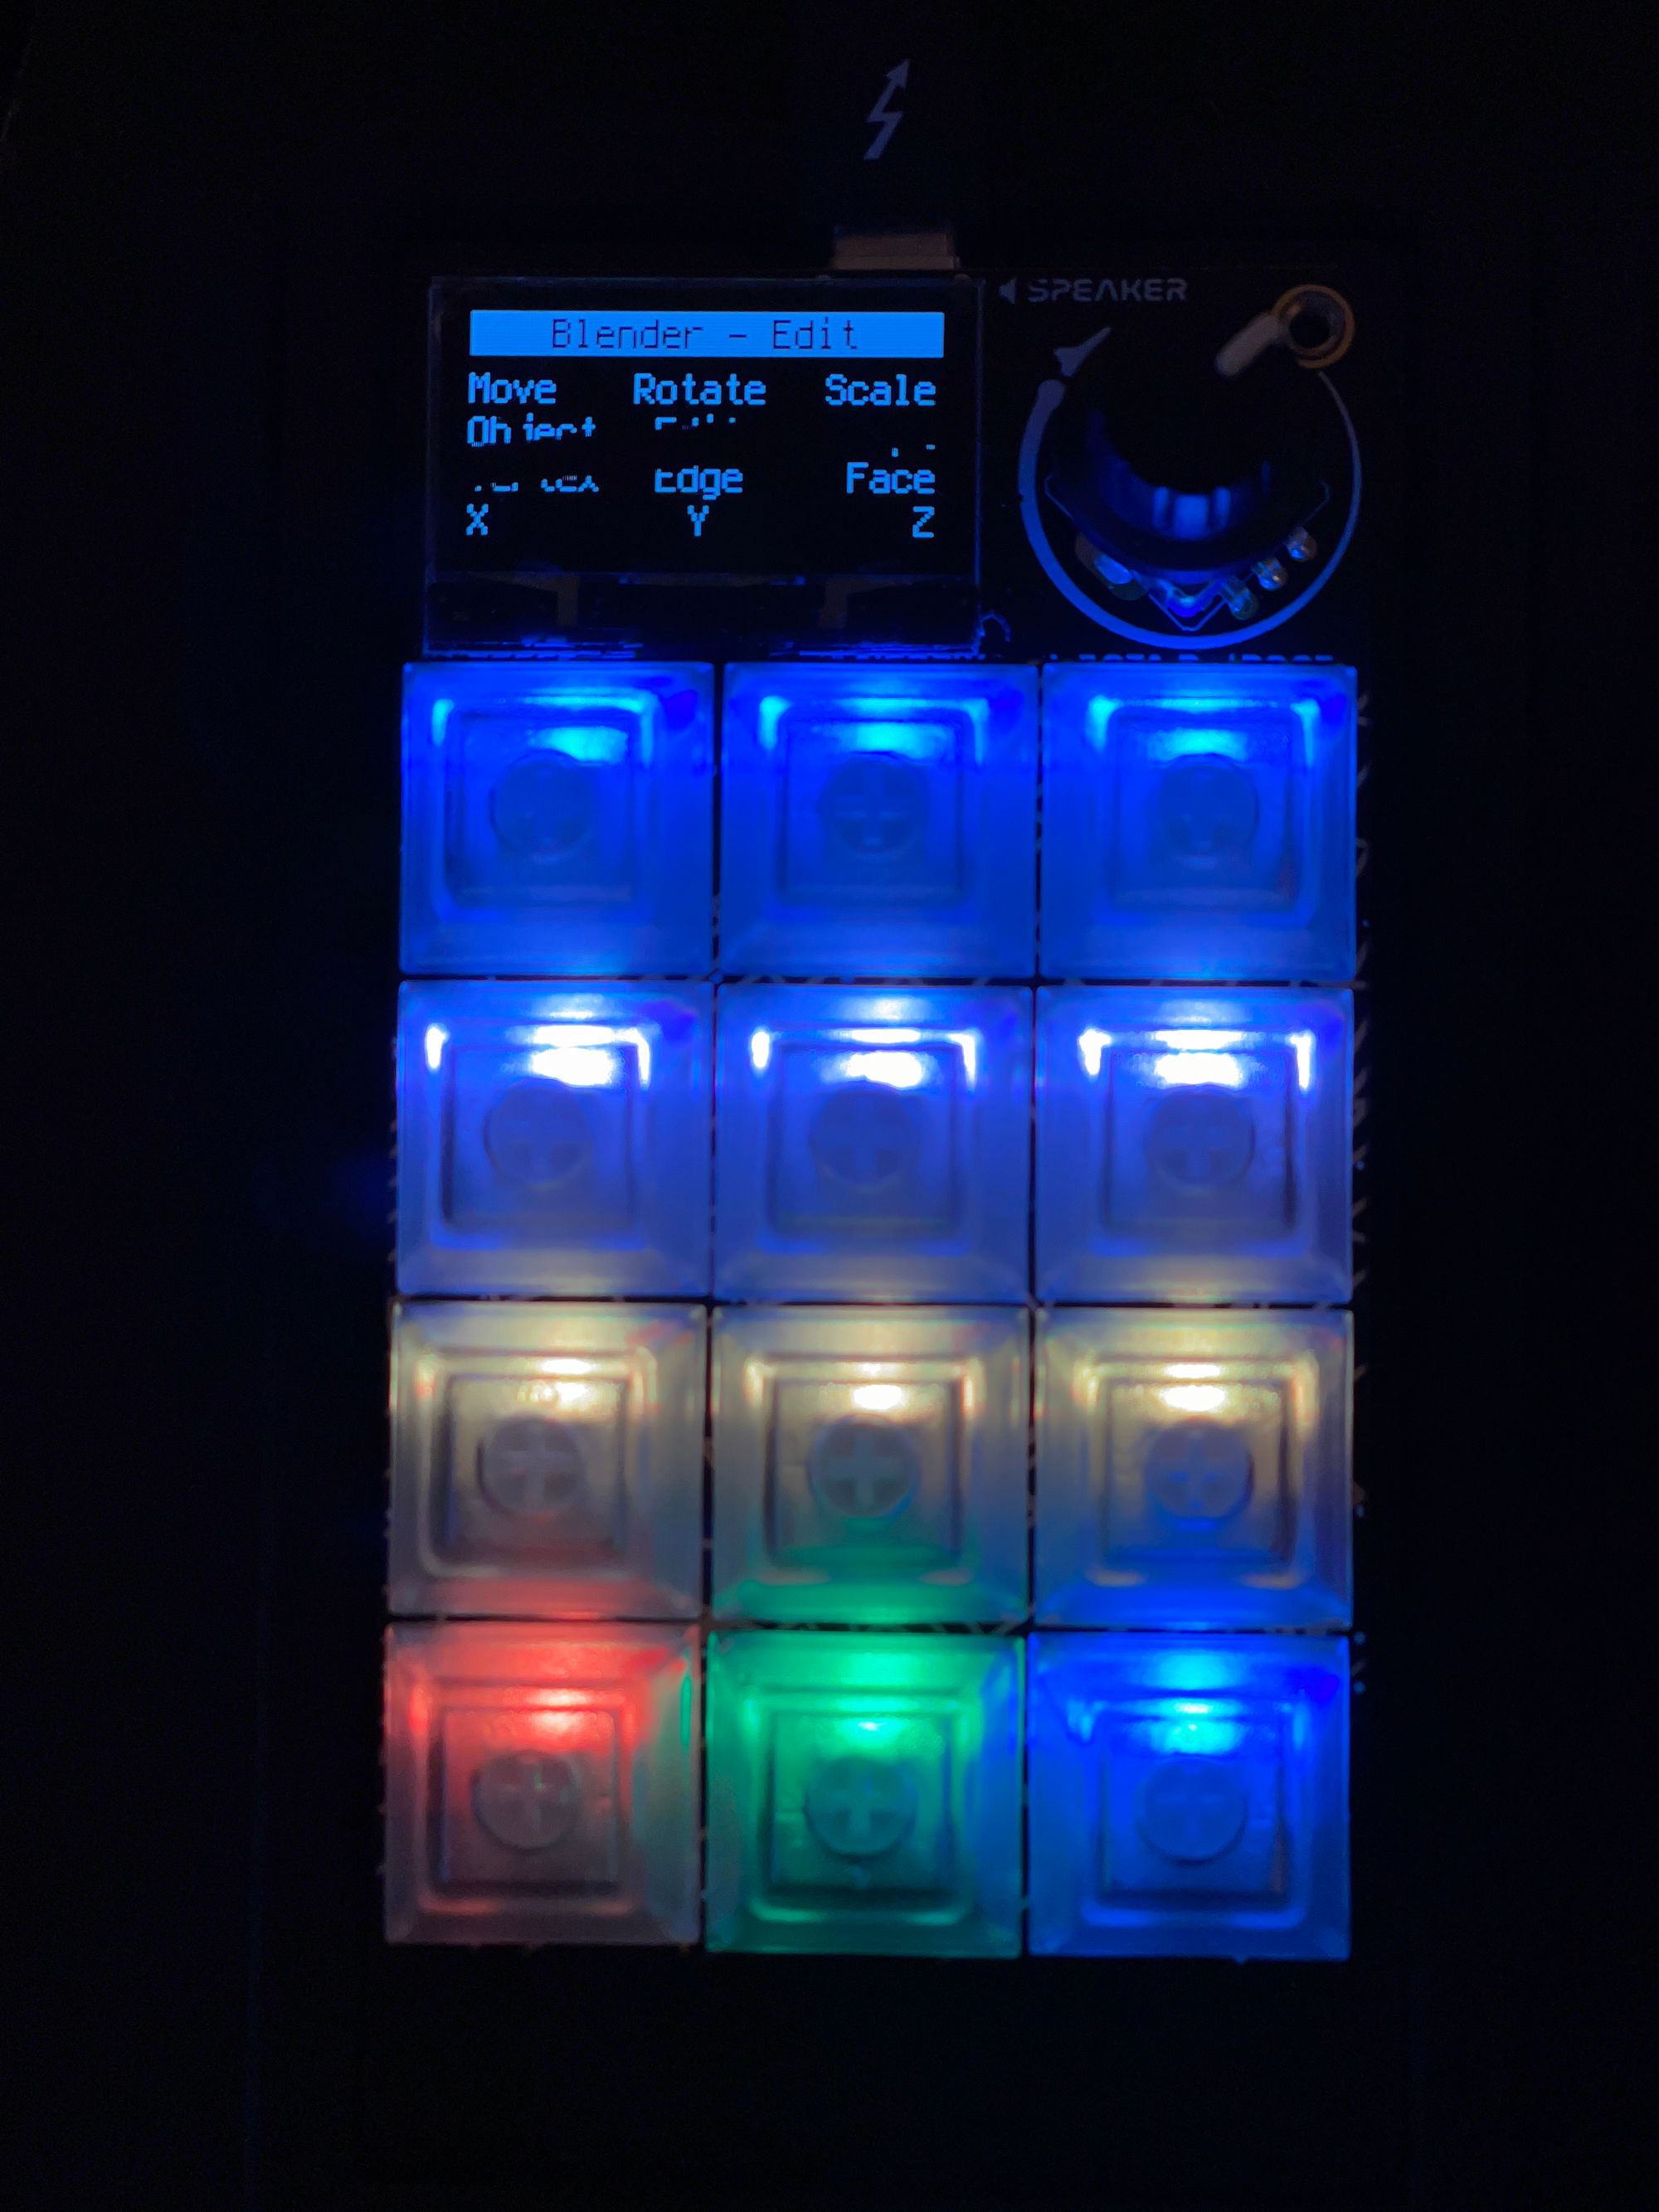
 Now I could bang out a new configuration in seconds, and what I saw in the editor was what I got on the Macropad.
“How’d you do that?”
In all, it was a weekend of effort to get this all rolling. At one point, showing it off, I was asked “How did you know how to do all of that?”
It’s a system integration problem! I’ve been doing that sort of thing for 20 years, so for a moment, I didn’t know where to start explaining. But to summarize the above, here’s how I approach this kind of challenge:
Find an existing, successful artifact
I need to start with something that already works. In this case, I found example code for the Macropad that was directionally aligned with my own goals. I’ve gotten so far in this game with example code. Code gives you pointers about how a system works, demonstrates its assumptions. It also gives you a starting point for your own approach.
No matter the system, in this age, you can usually find code that successfully interacts with it if you google hard enough.
Write down your unknowns
Once I’ve examined a working artifact, I usually end up with more questions than answers.
Hacking a project together is as much investigation as it is creation. I grab a pad of paper and keep track of my biggest unknowns to give that investigation its shape. After examining the example code, my biggest questions were:
- How does it represent color?
- How does it represent keycodes?
- How do I parse JSON in Python?
- How do I get feedback from the Macropad when things break?
If I found answers to these, I could build an external system that talked to the Macropad.
Learn how to communicate
The next step is asking “how does this system expect me to communicate my needs?”
Understanding the structure and format of data is essential. This step is equal parts research and experimentation. I need to find whatever documentation exists, even if it’s just source code, to understand the requirements and expectations of the system. Then, I need to try to create a working data structure of my own that the system will accept.
Build a bridge
Once you understand how to speak to a system, you need a means to reliably, repeatedly do so.
Here, I wrote a simple JSON parser to ingest and interpret external output into something Python could understand for one side of the bridge. On the other, I wrote Swift code that could generate JSON according to the expectations of that parser.
Fuck around, find out
With your unknowns revealed, a communication strategy understood, and a bridge constructed, you’re ready to start playing around. Experiment with different approaches until you get the results you’re looking for.
Sometimes you’ll break things. Use version control to keep track of your experiments, so you can always roll back to something you know is working.
Adafruit recommends the simple but effective Mu Python editor, which provides a serial connection to the Macropad. When I broke things, I could get hints about what went wrong that way through console log messages sent to the serial monitor.

Don’t let perfect be the enemy of done
Throughout this process, there were “better” ways to accomplish what I wanted. I wish I could have parsed JSON into native Python classes, I wish I could have imported the keycode.py content more transparently into Swift. In a well-behaved Mac app, you can double-click a list item to edit its name. Still not sure how to do it in SwiftUI.
It’s easy to get bogged down in the perfect solution, but I try to prioritize progress over perfection. Do the ugly, hacky thing first, then keep moving. If it comes to bite you later, you can rewrite it. Probably you’ll have a lot more context later, so the deeper solution will be better informed than if you’d tried it from jump.
What about the configurator?
Sure, here’s the code:
Macropad code, as adapted from the MACROPAD Hotkeys project
Stuff I might add in the future:
- Properly signed binary builds of the configurator (right now you’ll need Xcode)
- JSON import
- Multi-part macros with delays
- Undo support
- Direct user input capture of keystrokes
Maybe this will inspire you to write a web application that does the same things.
Hope this look inside the hack was interesting. Drop me a line with any questions you’ve got about how tech gets built. Much love to Adafruit, which makes the coolest electronics hobby stuff around. Projects like this Macropad remind me why I fell in love with technology:
- Exploration
- Experimentation
- Magic
I have the life and career I have because once upon a time, I learned how much fun it was to make things that talked to each other.